flowchart TD
A["New RStudio Project"] --> B["Install & load mccoursepack"]
B --> C["download_journal('mc451' | 'mc501')"]
C --> D["Source scripts/new_journal_entry.R"]
D --> E["new_journal_entry(week = N)"]
E --> F["(Optional) Rename entry file for clarity"]
F --> G["Open .qmd → keep ONE prompt → write in Response"]
G --> H["Render WHOLE book (auto-updates chapters)"]
H --> I["Stage + Commit + Push"]
Weekly Journal
Start with the Student Guide below.
Your course journal is a Quarto book. Each week has a chapter with three prompts–you answer one.
Word ranges are enforced when you render:
- MC 451: 250-300 words
- MC 501: 450-500 words
Step 1 – Create a new RStudio Project
- Open RStudio -> File -> New Project -> New Directory -> New Project.
- Choose a location (e.g.,
Documents/MC451/) and name it (e.g.,journal_project).
FIGURE 
Step 2 – Install and load the course package
In the Console:
pak::pak("SIM-Lab-SIUE/mccoursepack")
library(mccoursepack)
If prompted, restart R after installation.
FIGURE 
Step 3 – Download your starter journal
Run:
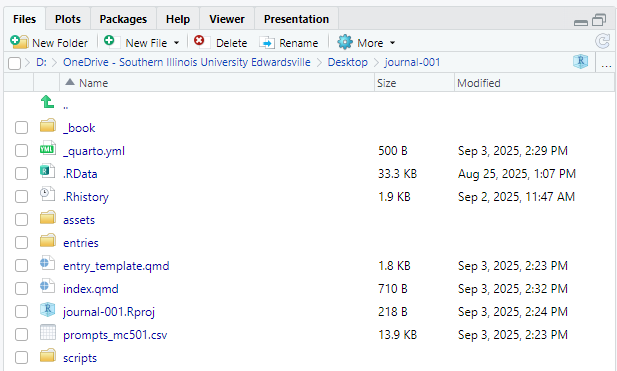
download_journal("mc451", dest = ".") # or "mc501"This populates your project’s main folder with the complete journal structure.
FIGURE 
Step 4 – Load the Journal Helper Function
Before you can add a new entry, you need to load the helper function that creates the file for you.
- In the Files pane (bottom-right), navigate into the
scriptsfolder. - Click on the file
new_journal_entry.Rto open it in the editor. - Click the Source button in the top-right corner of the editor pane.
This loads the new_journal_entry() function into your R environment for the current session.
Step 5 – Add a new week chapter
In the Console pane at the bottom-left, run:
# Pick your week number (2-14). Example:
new_journal_entry(week = 3)
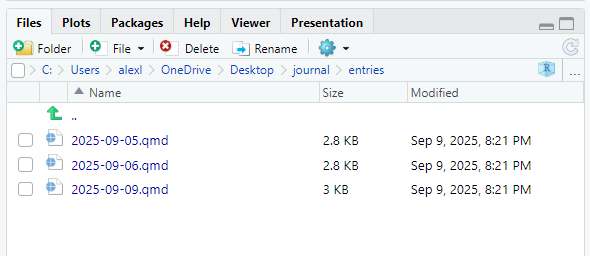
FIGURE 
What happens:
- A new chapter is created and named with today’s date:
entries/YYYY-MM-DD.qmd. - The three prompts for that week are inserted.
- The correct word range for your course is set.
_quarto.ymlis automatically updated to add the new chapter to the book’s table of contents.
FIGURE 
Troubleshooting: If you run the command twice on the same day, the file will be overwritten (same date name). If you need to keep both, rename the first file (e.g.,
2025-09-03b.qmd) before running again.
Step 6 – Handling Multiple Entries on the Same Day
The new_journal_entry() function names files by date (e.g., 2025-09-04.qmd). If you want to write a second entry on the same day for a different week’s prompt, you should rename the first file to something more descriptive before creating the new one.
For example, you could rename entries/2025-09-04.qmd to entries/2025-09-04-week3.qmd.
The good news is that you do not need to manually edit _quarto.yml. The journal is set up to automatically find all .qmd files in the entries/ directory every time you render it. This means you can add, remove, or rename your entry files, and the book will always build correctly.
Step 7 – Choose your prompt, then write
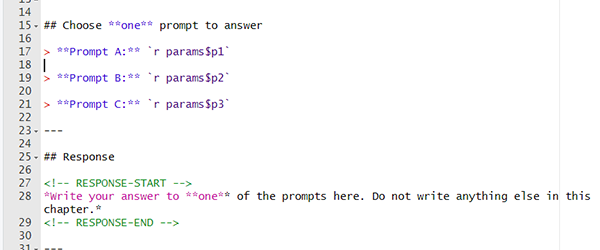
Open the new file (e.g., entries/2025-09-03.qmd). You’ll see Choose one prompt first, then Response.
Keep ONE prompt and delete the other two in the Choose one prompt section. Then write your answer only inside the Response block.
Choose one prompt to answer
Prompt A:
r params$p1Prompt B:r params$p2Prompt C:r params$p3
Response
Write your answer to one of the prompts here. Do not write anything else in this chapter.
Stay in range:
- MC 451: 250-300 words
- MC 501: 450-500 words
FIGURE 
Step 8 – Render the entire journal (unified output)
You have two equivalent options. Use one of them:
A) Click Render on index.qmd
- In the Files pane, click on
index.qmd. - Click the Render button in the editor toolbar.
B) Use the Console
# Run from the project's root directory
quarto render
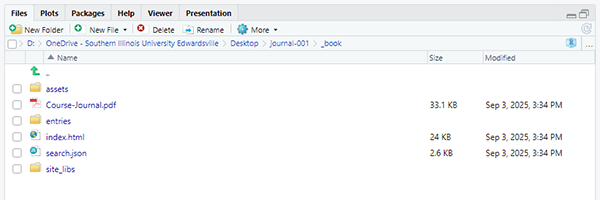
Outputs are in the _book/ directory:
- An HTML book (always, multi-page site with navigation = unified entity).
- PDF/EPUB if you have TinyTeX installed.
If a PDF fails to build, run:
quarto install tinytex
# or
mccourse_setup()
FIGURE 
Tip: Rendering a single chapter file will not produce the unified journal. Always render
index.qmd(or runquarto render) to build the whole book.
Step 9 — Submit via GitHub
When you add or edit a chapter, two files are modified:
- The new chapter file:
entries/YYYY-MM-DD.qmd - The book’s table of contents:
_quarto.yml(updated automatically by the pre-render script)
In RStudio:
- Open the Git pane.
- Stage both changed files.
- Add a commit message (e.g., “Week 3 journal entry”).
- Commit and Push.
If you forget to commit the changes to
_quarto.yml, your new chapter won’t appear in the published book.
Visual Workflow
FAQ
It didn’t ask me for the week number. Is that okay? Yes. In RStudio you usually call the function directly: new_journal_entry(week = 5).
My word count says “Out of range.” Edit until you are within the range for your course.
The new chapter doesn’t appear in the rendered book. Be sure you rendered the whole book (Render index.qmd or run quarto render from the project root). The pre-render script automatically updates the chapter list, but only when the entire book is rendered. Also, make sure you have committed both the new entry file and the automatically modified _quarto.yml.
Can I revise later? Yes. Edit the same entries/YYYY-MM-DD.qmd, then commit and push again.